# 组件测试
终于到正片了,这一章我们来讲讲组件测试中的一些技巧和策略吧。
# 需求
首先,我们还是以一个需求来开始这一章:实现一个 AuthButton,通过 getLoginState 获取当前用户的身份并在按钮中展示用户身份。
简单分析一下这个需求:
- 实现
AuthButton业务组件 - 在 API 函数
getLoginState发请求获取用户身份 - 把 Http 请求的返回
loginStateResponse展示到按钮上
我们先来安装一下 axios:
npm i axios@0.26.1
然后添加 src/apis/user.ts,里面写发送获取用户角色身份的 Http 请求:
import axios from "axios";

// 用户角色身份
export type UserRoleType = "user" | "admin";

// 返回
export interface GetUserRoleRes {
  userType: UserRoleType;
}

// 获取用户角色身份
export const getUserRole = async () => {
  return axios.get<GetUserRoleRes>("https://mysite.com/api/role");
};
2
3
4
5
6
7
8
9
10
11
12
13
14
添加业务组件 src/components/AuthButton/index.tsx:
// src/components/AuthButton/index.tsx
import React, { FC, useEffect, useState } from "react";
import { Button, ButtonProps, message } from "antd";
import classnames from "classnames";
import styles from "./styles.module.less";
import { getUserRole, UserRoleType } from "apis/user";

type Props = ButtonProps;

// 身份文案 Mapper
const mapper: Record<UserRoleType, string> = {
  user: "普通用户",
  admin: "管理员",
};

const AuthButton: FC<Props> = (props) => {
  const { children, className, ...restProps } = props;

  const [userType, setUserType] = useState<UserRoleType>();

  // 获取用户身份并设置
  const getLoginState = async () => {
    const res = await getUserRole();
    setUserType(res.data.userType);
  };

  useEffect(() => {
    getLoginState().catch((e) => message.error(e.message));
  }, []);

  return (
    <Button {...restProps} className={classnames(className, styles.authButton)}>
      {mapper[userType!] || ""}
      {children}
    </Button>
  );
};

export default AuthButton;
2
3
4
5
6
7
8
9
10
11
12
13
14
15
16
17
18
19
20
21
22
23
24
25
26
27
28
29
30
31
32
33
34
35
36
37
38
39
这里我们还不忘搞点花里胡哨,引入了 src/components/AuthButton/styles.module.less:
// src/components/AuthButton/styles.module.less
.authButton {
  border: 1px solid red;
}
2
3
4
最后在 App.tsx 里使用一下:
// src/App.tsx
const App = () => {
  return (
    <div>
      <section>
        <AuthButton>登录</AuthButton>
      </section>
    </div>
  )
}
2
3
4
5
6
7
8
9
10
# Less 的引入问题
好,现在我们一个一个问题来看。写完上面的代码后,TS 首先受不了报错:

我们需要在全局类型声明文件 src/types/global.d.ts 里添加 .less 文件的类型定义:
// src/types/global.d.ts
declare module "*.less" {
  const content: any;
  export default content;
}
2
3
4
5
相信大家都能看懂 AuthButton 的代码,就不展示页面的情况了,下面主要来讨论测试用例的问题。
创建一个用例 tests/components/AuthButton/simple.test.tsx:
// tests/components/AuthButton/simple.test.tsx
import { render, screen } from "@testing-library/react";
import AuthButton from "components/AuthButton";
import React from "react";

describe('AuthButton', () => {
  it('可以正常展示', () => {
    render(<AuthButton>登录</AuthButton>)

    expect(screen.getByText('登录')).toBeDefined();
  });
})
2
3
4
5
6
7
8
9
10
11
12
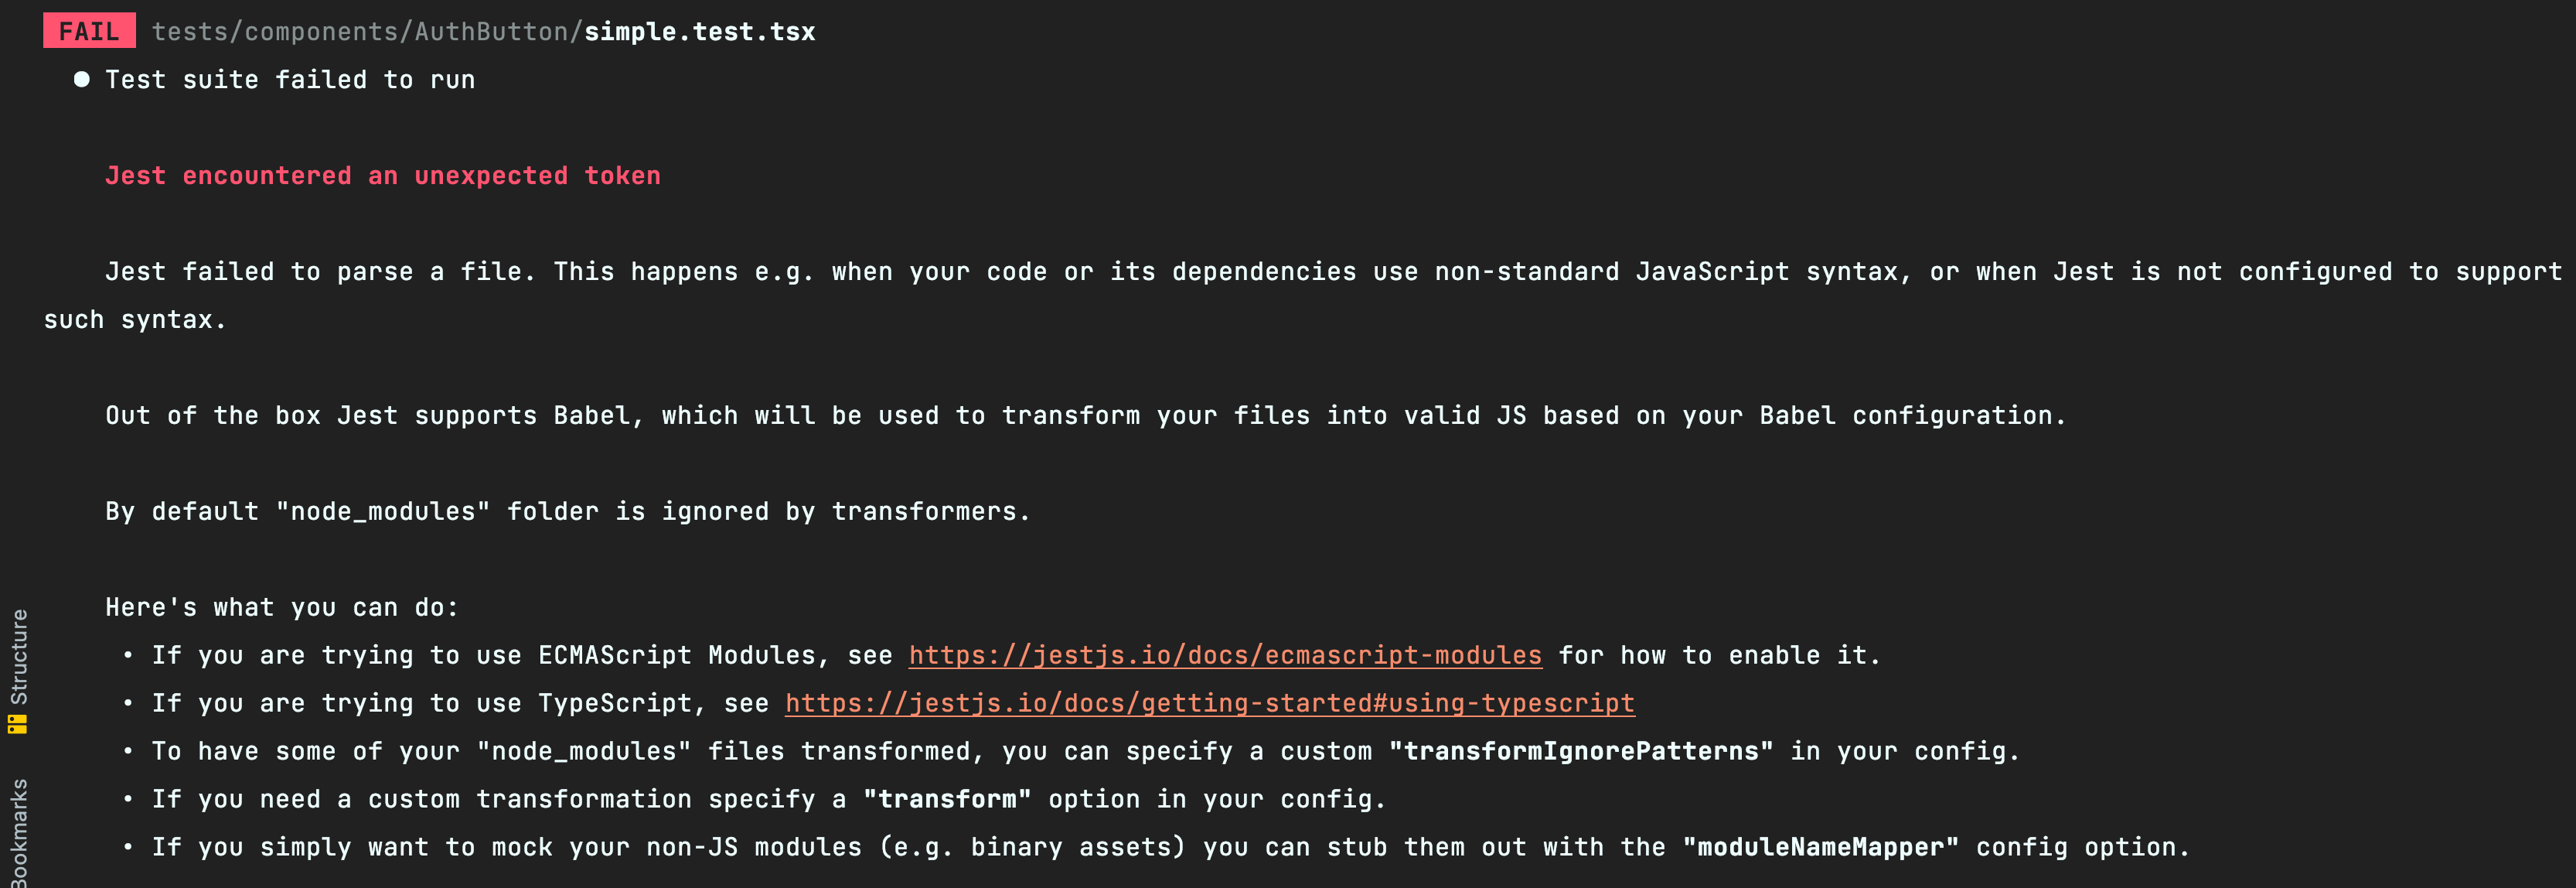
执行一下,直接报错:

前面的章节说了 Jest 不会转译任何内容,因此我们一直用 tsc 来转译 TypeScript。由于 tsc 看不懂引入的 .less,导致了 Unexpected Token 报错。
相信有的同学说:刚刚配置 React 时,不是有一个 webpack.config.js 配置了 less-loader 了么?为什么还是会报错?
很简单,Jest 只是 Test Runner,只负责跑测试,tsc 负责转译 .ts 文件,webpack 则作为脚手架用于跑项目的工具,所以这三者本身不存在任何交集。
只不过,中间 ts-jest 把 jest 和 tsc 联系起来,ts-loader 则把 webpack 和 tsc 联系在了一起。所以无论你的 Webpack 配得怎么天花乱坠,Jest 根本不看。
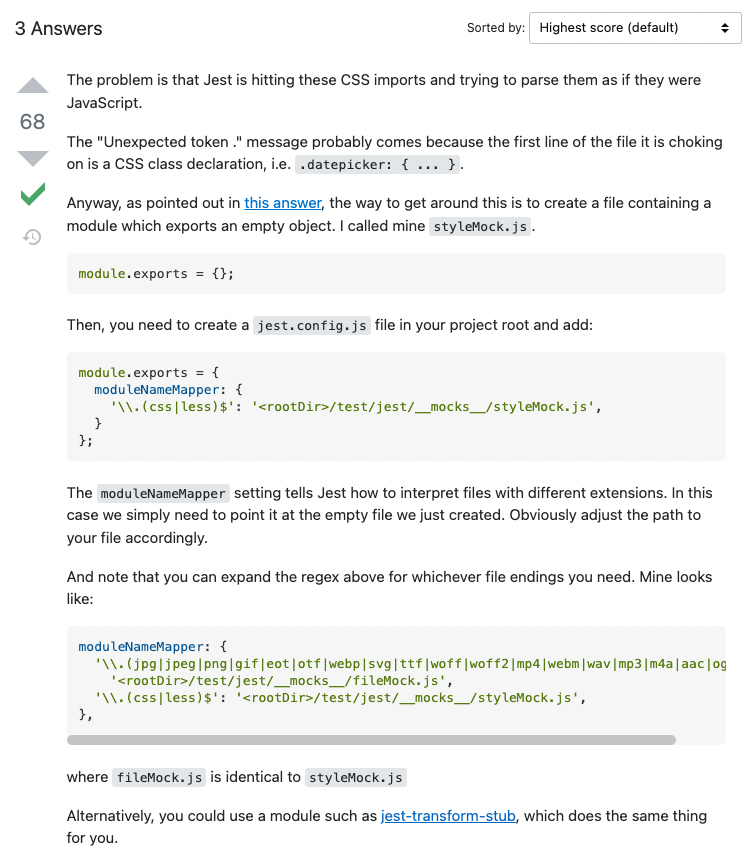
那问题要怎么解决呢?比较推荐的方法是把 .less 转译成空文件。 这在 StackOverflow 上有很多例子 (opens new window) :

除了 .less 文件,我们还要对非 JS 静态资源做转译,比如 jpg, svg, png 等等(这些不会影响测试)。
这里推荐使用 jest-transform-stub (opens new window) 这个库:
npm i -D jest-transform-stub@2.0.0
然后在 jest.config.js 里添加转译配置:
// jest.config.js
module.exports = {
  // ...
  transform: {
    ".+\\.(css|styl|less|sass|scss|png|jpg|ttf|woff|woff2)$": "jest-transform-stub"
  }
}
2
3
4
5
6
7
现在再来跑测试就会发现测试通过。
# 更多 Matchers
不知道你会不会觉得 expect(screen.getByText('登录')).toBeDefined(); 有点不靠谱啊。假如 getByText 返回的是一个 null,这样一来就算找不到元素依然会测试通过。
实际上,我们更希望的断言是:判断带有 “登录” 的元素是否渲染出来,而不是看拿到的元素是否为 undefined 或者 null。
这种要判断 XXX 的东西,我们称之为 Matcher(中文翻译为匹配器,个人觉得翻译很烂,记住 Matcher 就好)。 正好 @testing-library/jest-dom (opens new window) 这个库提供了很多关于 DOM 的 Matcher API:
- toBeDisabled
- toBeEnabled
- toBeEmptyDOMElement
- toBeInTheDocument
- toBeInvalid
- toBeRequired
- toBeValid
- toBeVisible
- toContainElement
- toContainHTML
- toHaveAccessibleDescription
- toHaveAccessibleName
- toHaveAttribute
- toHaveClass
- toHaveFocus
- toHaveFormValues
- toHaveStyle
- toHaveTextContent
- toHaveValue
- toHaveDisplayValue
- toBeChecked
- toBePartiallyChecked
- toHaveErrorMessage
下面我们安装一下:
npm i -D @testing-library/jest-dom@5.16.4
然后在 tests/jest-setup.ts 里引入一下:
// tests/jest-setup.ts
import '@testing-library/jest-dom'
// ...
2
3
同时,要在 tsconfig.json 里引入这个库的类型声明:
{
  "compilerOptions": {
    "types": ["node", "jest", "@testing-library/jest-dom"]
  }
}
2
3
4
5
然后我们的用例就可以写成这样了:
describe('AuthButton', () => {
  it('可以正常展示', () => {
    render(<AuthButton>登录</AuthButton>)

    expect(screen.getByText('登录')).toBeInTheDocument();
  });
})
2
3
4
5
6
7
这样一来,我们就不用担心 getByText 返回值了。
WARNING
如果你的项目报了 Entry point of type library '@testing-library/jest-dom' specified in compilerOptions 这个错误,
可以按照 这个 Issue (opens new window) 来修复。
# 三种 Mock 思路
上面只是一个 Demo 测试,现在我们来测这个组件的功能。
# Mock Axios
相信大家看过不少教 Jest Mock 的文章,它们经常用的第一个例子就是 Mock axios。这里也用了 axios 发请求,我们可以来 Mock 一下。
添加 tests/components/AuthButton/mockAxios.test.tsx:
// tests/components/AuthButton/mockAxios.test.tsx
import React from "react";
import axios from "axios";
import { render, screen } from "@testing-library/react";
import AuthButton from "components/AuthButton";

// 更偏向细节,效果并不好
describe("AuthButton Mock Axios", () => {
  it("可以正确展示普通用户按钮内容", async () => {
    jest.spyOn(axios, "get").mockResolvedValueOnce({
      // 其它的实现...
      data: { userType: "user" },
    });

    render(<AuthButton>你好</AuthButton>);

    expect(await screen.findByText("普通用户你好")).toBeInTheDocument();
  });

  it("可以正确展示管理员按钮内容", async () => {
    jest.spyOn(axios, "get").mockResolvedValueOnce({
      // 其它的实现...
      data: { userType: "admin" },
    });

    render(<AuthButton>你好</AuthButton>);

    expect(await screen.findByText("管理员你好")).toBeInTheDocument();
  });
});
2
3
4
5
6
7
8
9
10
11
12
13
14
15
16
17
18
19
20
21
22
23
24
25
26
27
28
29
30
上面我们分别对两个用例的 axios.get 进行了 Mock,使得一个 Mock 返回 user,另一个 Mock 返回 admin。
最后,在这两个用例里分别断言 <AuthButton/> 的渲染内容。
Mock axios 确实是一个方法,但只有这种方法么?No!
# Mock API 函数
另一种方法是 Mock apis/user.ts 里的 getUserRole API 函数,一样能达到相同的效果:
// tests/components/AuthButton/mockGetUserRole.test.tsx
import React from "react";
import { render, screen } from "@testing-library/react";
import AuthButton from "components/AuthButton";
// 注意:这里要写成 * as userUtils!!!
import * as userUtils from "apis/user";
import { AxiosResponse } from "axios";

// 也很偏向细节,效果也不好
describe("AuthButton Mock Axios", () => {
  it("可以正确展示普通用户按钮内容", async () => {
    jest.spyOn(userUtils, "getUserRole").mockResolvedValueOnce({
      // 其它的实现...
      data: { userType: "user" },
    } as AxiosResponse);

    render(<AuthButton>你好</AuthButton>);

    expect(await screen.findByText("普通用户你好")).toBeInTheDocument();
  });

  it("可以正确展示管理员按钮内容", async () => {
    jest.spyOn(userUtils, "getUserRole").mockResolvedValueOnce({
      // 其它的实现...
      data: { userType: "admin" },
    } as AxiosResponse);

    render(<AuthButton>你好</AuthButton>);

    expect(await screen.findByText("管理员你好")).toBeInTheDocument();
  });
});
2
3
4
5
6
7
8
9
10
11
12
13
14
15
16
17
18
19
20
21
22
23
24
25
26
27
28
29
30
31
32
和第一种方法类似,我们依然监听了某个函数(这里是 getUserRole),通过 Mock 其返回来模拟不同场景。
# Mock Http
那还有没有别的方法呢?当然有!我们可以不 Mock 任何函数实现,只对 Http 请求进行 Mock!先安装 msw (opens new window) :
TIP
msw (opens new window) 可以拦截指定的 Http 请求,有点类似 Mock.js (opens new window) ,是做测试时一个非常强大好用的 Http Mock 工具。
npm i -D msw@0.39.2
先在 tests/mockServer/handlers.ts 里添加 Http 请求的 Mock Handler:
import { rest } from "msw";

const handlers = [
  rest.get("https://mysite.com/api/role", async (req, res, ctx) => {
    return res(
      ctx.status(200),
      ctx.json({
        userType: "user",
      })
    );
  }),
];

export default handlers;
2
3
4
5
6
7
8
9
10
11
12
13
14
然后在 tests/mockServer/server.ts 里使用这些 handlers 创建 Mock Server 并导出它:
import { setupServer } from "msw/node";
import handlers from "./handlers";

const server = setupServer(...handlers);

export default server;
2
3
4
5
6
最后,在我们的 tests/jest-setup.ts 里使用 Mock Server:
import server from "./mockServer/server";

beforeAll(() => {
  server.listen();
});

afterEach(() => {
  server.resetHandlers();
});

afterAll(() => {
  server.close();
});
2
3
4
5
6
7
8
9
10
11
12
13
这样一来,在所有测试用例中都能获得 handlers.ts 里的 Mock 返回了。如果你想在某个测试文件中想单独指定某个接口的 Mock 返回,
可以使用 server.use(mockHandler) 来实现。 我们以 <AuthButton/> 为例:
// tests/components/AuthButton/mockHttp.test.tsx
// 更偏向真实用例,效果更好
import server from "../../mockServer/server";
import { rest } from "msw";
import { render, screen } from "@testing-library/react";
import AuthButton from "components/AuthButton";
import React from "react";
import { UserRoleType } from "apis/user";

// 初始化函数
const setup = (userType: UserRoleType) => {
  server.use(
    rest.get("https://mysite.com/api/role", async (req, res, ctx) => {
      return res(ctx.status(200), ctx.json({ userType }));
    })
  );
};

describe("AuthButton Mock Http 请求", () => {
  it("可以正确展示普通用户按钮内容", async () => {
    setup("user");

    render(<AuthButton>你好</AuthButton>);

    expect(await screen.findByText("普通用户你好")).toBeInTheDocument();
  });

  it("可以正确展示管理员按钮内容", async () => {
    setup("admin");

    render(<AuthButton>你好</AuthButton>);

    expect(await screen.findByText("管理员你好")).toBeInTheDocument();
  });
});
2
3
4
5
6
7
8
9
10
11
12
13
14
15
16
17
18
19
20
21
22
23
24
25
26
27
28
29
30
31
32
33
34
35
这里声明了一个 setup 函数,用于在每个用例前初始化 Http 请求的 Mock 返回。通过传不同值给 setup 就可以灵活模拟测试场景了。
# 如何取舍
现在我们一共有 3 种 Mock 策略:
- Mock
axios - Mock API 实现
- Mock Http 请求
到底如何选择呢?你可以停下来思考一两分钟。
在说出我的选择前,我们不妨想想我们做测试的初衷是什么。是因为我让你测试才测试?还是因为你要完成那可怜的 100% 覆盖率?再或者是因为没有测试显得你的项目很 Low?都不是! 无论后端测试也好、前端测试也好,不管你要测什么,测试的目的都是为了让你能对测过的代码充满信心(Confidence)。
你可以通过作弊的手法骗过覆盖率,可以通过写一些无聊没有意义的用例骗过你的老板,也可以干脆去掉测试环节,让大家直接在 master 上推代码。即使你能骗过所有人,
你依然无法骗自己 —— 在重构和代码改造时,你仍然不信任写过的代码。那么,什么样的测试才能提高代码自信呢?很简单:像真实用户那样去测你的代码。
这里说的用户一共分为两种:
- 普通用户。 也即使用网页的人
- 开发者。 接口使用者、数据消费者、API 调用侠
刚接触测试的人很容易犯的一个错误就是:过度测试代码细节! 虽然我们经常讨论前端单测,单测不就是白盒么?白盒就是要关注代码细节呀。但是很多时候,特别是在测业务相关逻辑的时候, 过度关注代码细节无形中会创造第三种用户:测试用户。 也即,只有测试用户才会像你测试用例那样使用你的代码/组件/页面。
我们回到刚刚的例子,可以看出来 Mock axios 和 Mock getUserRole 都融入很多代码细节,无论对于使用 AuthButton 组件的开发者以及和 AuthButton 交互的用户,
都不应该关注组件里到底用的是哪个接口和调用了哪个函数,这太细节了!这就产生了测试用户,因为只有测试用户才会用假的 axios 和 getUserRole 实现。
对于上面两类用户来说,他们感知到的就是管理员和普通用户两个 case,最能模拟出这种感知的就是第三种 Mock —— Mock Http 请求,所以,在这个例子中,我觉得对 Http 请求 Mock 更合理一些。
测试实现细节还有很多缺点,比如,在 Mock getUserRole 这个方法中,如果有人把 getUserRole 重命名成 getUserRoleById,那么你的测试直接就挂了。这就是上一章所说的 “假错误”。
对于不熟悉 AuthButton 实现的人来说,要找到测试失败的源头是比较麻烦的。
# 如何避免测试用户
当然,上面说的并不是完全不测代码细节。对于一些工具纯函数是需要深入测好每个 if-else 的,这是因为这种场景下 “真实用户” 变成了开发者,
所以当然要深入细节来测,这与刚刚说的观点并不冲突。
上文观点主要是希望大家避免产生 “测试用户”。 一旦你的测试面向 “测试用户” 编写,那么你的测试会变得非常冗余,难以维护。一旦要做重构,所有测试都要跟着改。 这也是为什么大家特别讨厌测试的原因。并不是测试影响了你的效率,而是那些差劲的测试代码拖累了你。
所以要怎么才能避免测试用户呢?拿到要测的业务代码后,我们要去分析:
- 这段代码的 真实用户 是谁?开发者还是普通用户?谁会从中获利?
- 确定了用户后,用测试用例模拟一个相对 真实的使用场景
- 接下来思考 为了模拟这个场景,要做哪些 Mock 操作?
带着上面的方法回过头来看 AuthButton 这个例子:
- 用户是谁:这个组件的真实用户更偏向普通用户(个人觉得)
- 使用场景是什么:
<AuthButton>登录</AuthButton> - 存在哪些外部依赖:要把 Http 请求 Mock 掉
在真实业务中,开发者一般喜欢用 antd 或者 element-ui 来封装业务组件,对于这些组件我们实际更关注的是交互逻辑,而不是实现逻辑。
当然,也有可能你会觉得这里的 “用户” 是开发者,最终选择把 getUserRole Mock 掉。这样做也没问题,因为测试本来就是一个取舍的过程,不像写业务有一个绝对准确的结果。
只要你觉得这么测能带给你更强的代码信心,那就放手去写吧!
# 总结
这一章里,我们学到了:
- 可以用 jest-transform-stub (opens new window) 来转译非 JS 静态资源文件
- 可以用
jest.spyOn来 Mock 对象中的函数 - 在做测试策略的选择时,我们要避免产生测试用户,要面向 开发者 和 普通用户 来写测试用例
